 Lay down a base polish color of your choosing. Then just swipe two coordinating colors across in a plaid pattern using a toothpick. Easy, kind of punky, and super fun.

Showing posts with label nail polish. Show all posts
Showing posts with label nail polish. Show all posts
Saturday, August 20, 2011
Plaid Nails
Lay down a base polish color of your choosing. Then just swipe two coordinating colors across in a plaid pattern using a toothpick. Easy, kind of punky, and super fun.


Sunday, August 14, 2011
Gel Nail Stickers
I was at the mall recently and ran into one of the accessory stores. I saw these gel nail stickers and decided to try them out.
 I can't say that I totally loved them. They didn't stay on my nails very long and not all the stickers had flowers on there. If they'd stayed on better and if I'd had a coat of color underneath them, they would have been better. But while they lasted, they were kind of cute!

 I can't say that I totally loved them. They didn't stay on my nails very long and not all the stickers had flowers on there. If they'd stayed on better and if I'd had a coat of color underneath them, they would have been better. But while they lasted, they were kind of cute!

Saturday, July 30, 2011
Sally Hansen nails
This week, I decided to show you some nails using one of my favorite products - Sally Hansen Nail Effects. I love this product because it's easy to use and it stays on your nails for a very long time. Plus, they're super cute. I've used Nail Effects before, and I've loved the results each time. All you do is stick the stickers on. No heating, no stretching. All you really need to do other than stick them on is file off the excess. The stickers stay on for upwards of 2 weeks (in my experience). Love them!
 I've used Nail Effects before, and I've loved the results each time. All you do is stick the stickers on. No heating, no stretching. All you really need to do other than stick them on is file off the excess. The stickers stay on for upwards of 2 weeks (in my experience). Love them!
Sunday, July 10, 2011
Triangle nail polish
 I painted my nails white and then went back over with black to divide the nails into triangles. I feel very '80's with these nails, and they're super fun!
Friday, July 8, 2011
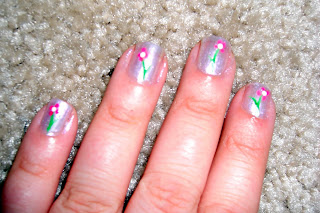
Flower Fingers
This week, I decided to try out some of those thin brush nail paints. I started with a coat of pale pink paint and let it dry. Then I took a green thin brush paint and did two lines, one for the stem and one for a leaf. Then I took a pink thin brush paint and did 5 dots around the stem for the petals. I didn't have a white thin brush paint, so I improvised. A little acrylic toll paint and a toothpick allowed me to do a white dot for the center of the flower and to do a streak up the leaf to define it. Pretty cute, huh?



Tuesday, June 28, 2011
Jammin' Berry Nails
I ordered some nail shields from Jamberry Nails and decided to try them out for you all to see.

 They look really cute and it's a fun way to get a really neat pattern without all the legwork. The problem was that they didn't stay on very long and were hard to get to stick to my nails. So while they are super fun and super cute, I'd recommend using the Sally Hansen brand instead.

 They look really cute and it's a fun way to get a really neat pattern without all the legwork. The problem was that they didn't stay on very long and were hard to get to stick to my nails. So while they are super fun and super cute, I'd recommend using the Sally Hansen brand instead.
Tuesday, June 21, 2011
Crackle Nail Polish
As promised, once a week, there's gonna be a nail polish post. I like doing fun and different things with my nails and I paint them at least once a week anyway, so why not put it up here?
This first once-a-week polish post (though I've posted about polish before) is a really cool concept that's, according to the one or two fashion magazines I've read this month, the latest trend. The good thing is that it's super easy. We are talking about crackle paint.
 Here's how it works. You paint your nails a solid color, let it dry, and then put a thin coat of crackle paint on top. Make sure it's a thin coat or it won't crackle. Then put on a top coat to make sure it's legit, and there you go! It stays on quite well (I've had it on for 5 days with no chipping, and I'm a pro at chipping my polish) and it's super fun.
This first once-a-week polish post (though I've posted about polish before) is a really cool concept that's, according to the one or two fashion magazines I've read this month, the latest trend. The good thing is that it's super easy. We are talking about crackle paint.
 Here's how it works. You paint your nails a solid color, let it dry, and then put a thin coat of crackle paint on top. Make sure it's a thin coat or it won't crackle. Then put on a top coat to make sure it's legit, and there you go! It stays on quite well (I've had it on for 5 days with no chipping, and I'm a pro at chipping my polish) and it's super fun.
Saturday, December 18, 2010
Christmas Feet
Time Needed: 5 minutes
Level of difficulty: easy
Materials needed: red, green, and white nail polish, toothpick
Paint your toes red and green, alternating toes. Then, once that's dried enough, use the toothpick to add white dots. Aww, Christmas!
Level of difficulty: easy
Materials needed: red, green, and white nail polish, toothpick

Paint your toes red and green, alternating toes. Then, once that's dried enough, use the toothpick to add white dots. Aww, Christmas!
Saturday, October 2, 2010
Tiger Toes
Time Needed: 10 minutes
Level of difficulty: easy
Materials needed: base coat, top coat, light colored polish, thin-tipped black polish
Directions: Paint on a base coat and let dry. Then paint on the light color in as many layers as you need to get the desired colors and let dry. Then, paint on squiggly lines with the black polish. Don't try to make them straight or perfect - that's not the point. Once dry, top with the top coat and let dry again. And now you have cute tiger toes. Woo woo!
Level of difficulty: easy
Materials needed: base coat, top coat, light colored polish, thin-tipped black polish

Directions: Paint on a base coat and let dry. Then paint on the light color in as many layers as you need to get the desired colors and let dry. Then, paint on squiggly lines with the black polish. Don't try to make them straight or perfect - that's not the point. Once dry, top with the top coat and let dry again. And now you have cute tiger toes. Woo woo!
Subscribe to:
Posts (Atom)