Showing posts with label fabric. Show all posts

Monday, June 20, 2011

You knotty flop!

Yes, yes, another pair of flops. Last one (for this week), I swear!You see, this whole flop thing got started when I visited this site and saw these flops. I decided to try them, and then invent three bajillion of my own.Basically, thread the fabric into the toe slot (as in the 3 previous flops) and tie/glue it off. Then, tie two knots starting 1 inch above the flop. Then thread through the side holes, tighten to however tight you need them for your specific foot, and tie/glue off. And then make your friend Heather model them for you, but only after you bribe her with brownie banana splits. :)

Saturday, June 18, 2011

Flower Flips

Flip #3 time. Take a piece of fabric and roll it up like a cigar (since I know so much about cigar rolling and all). Loop it into 5 pieces and glue it to the back of a big flat bead. Then glue that to the strap of your flip. For security, glue a scrap of fabric to the back of the strap and the back of the bead. Super easy, super fun, and super cute!

Criss Cross Flip Flop

Time for flippy #2. This starts the same as flip 1. Tie off the flop under the toe strap, but this time, tie a knot about an inch past the top of the flop. Take an extra piece of fabric and create loops on the side straps, and thread the fabric through the toe straps through these. Take the extra fabric and create a bow on the sides. Add an extra piece of fabric across the top of the foot to keep the flop tight, and there you go. So fun!

Beaded Flip Flop

It's summer. That means flip flops. And that means crafting flip flop straps. So here's flip #1 - the beaded flip flop. Cut out the plastic strap and cut 2 pieces of fabric. Thread them through the toe strap and tie them off. Glue if needed. Thread on the bead, and then thread the straps through the side holes. Put your foot in the sandal to measure how tight you need to tie the straps, tie them off, and voila! The easiest pair of flips ever. And super cute, too!

Sunday, May 15, 2011

Cupcake gift boxes

You may have seen this before, but I thought I'd break it down. I made these cute cupcake gift boxes, all from supplies I either had on hand or got at the dollar store. Total cost was under $2. And that is fabulous!I got these three tins for a dollar and I got a whole pack of round styrofoam balls. I only used 2 of them, so I have a ton to use for another project later. I cut the balls in half and glued them on the top of the tin lids.For two of the lids, I took ribbon and did a loose stitch along the edge. I then pulled the thread tight, which made the ribbon bunch up. I started at the top of the ball, and glued the ribbon in a circle around the styrofoam until the whole ball was covered.For the other one, I followed the same basic pattern in the foursquare flower, except that I scrunched the petals and glued them from the center down on the styrofoam ball. On top of each of the "cupcakes" I glued on a few buttons as decorations.I then took a strip of paper, used some scrapbooking scissors to make the edges all foofy, and folded the paper like an accordin to give it the look of a cupcake wrapper. I wrapped this around the bottom of the tin, and there you go! I can't wait to use these for gifts for my cute friends.

Saturday, February 19, 2011

(Badly Needed) Pillow Covers

This is one of my couches. When the hubs and I got married, my mom and dad gave us these babies so we could furnish our apartment. I remember having these couches before my 16 year old sister was alive. I wish I had a copy of the family pictures we all took on these couches wearing all denim - super sexy. Regardless, they are comfortable as all get-out, but they look a little... well... they could look better. I'm going to cover the couches eventually, but covering the pillows that are in the same pattern was what I had the energy for this week. Here's what I did:
Time Needed: 2 hours
Level of difficulty: intermediate
Materials needed: 4 yards of fabric plus 1/2 yard of accent fabric (variable by pillow size), sewing machine and thread, scissors, ugly pillows
Directions: Measure your pillows. Mine were 17x17. Then measure out how much fabric you'll wanna use. I cut out swatches that were 38x19 because then I had a 2 inch allowance for my amazing skills and because that's one less seam I have to sew if the front and back are already attached. Anyway... Go back to your original color and cut out a rectangle that's about the width of your pillow and add about 5 inches or so onto the length. As you are sewing all your seams all the way around the pillow, you're gonna add this to the side hems. It'll hang in the front, and the accent fabric will draw it together. Before you sew, grab your extra fabric rectangle, flip it inside out, and sew some tubes. Flip 'em right side out, sew them shut, and stick them on your piece that you'll be gathering. Now enjoy all those hems - on the extra fabric rectangle, on the sides of pillow, and on. Now, don't sew these shut - instead, sew flaps so you can stick the pillow in and so that when you get bored with these covers, you can make new ones and switch out the pillows without destroying your work. And voila! My ugly couches at least have cute pillows until I can cover those suckers.

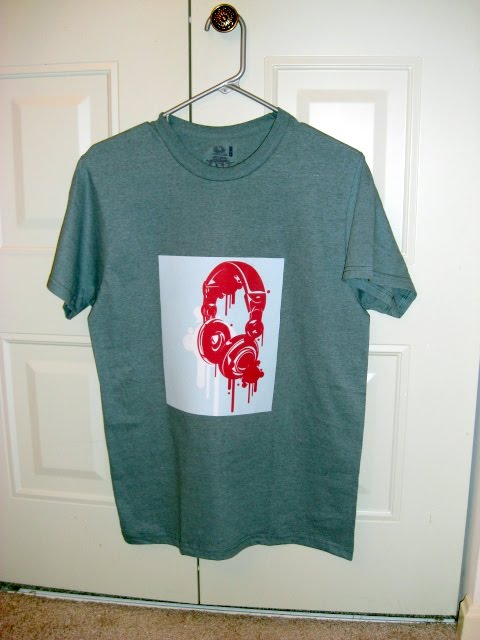
Cool T-Shirt

My hubs is really into music and computer games, so he's pretty much 24/7 attached to his headphones. Plus he used to want to be a DJ. I just had to surprise him with this neat t-shirt. And it was super cheap - double bonus!Time Needed: 5-10 minutes
Level of difficulty: easy
Materials needed: blank t-shirt, computer/printer, transfer paper, scissors, iron, ironing board
Directions: Find a picture you want to transfer and, if needed, photoshop that sucker. I lightened the one I found a little bit because of the t-shirt it was going on. Then print that baby on the transfer paper (follow the directions on the package). Lay out the shirt, and iron according to transfer paper directions. And wear with pride.

Cost breakdown: I got 4 shirts for 6 bucks in one of those multiple t-shirt packs at Wal-Mart. I also got my transfer paper there. It was like $3.50 for 3 sheets. So the whole thing cost less than 3 bucks, plus I have materials to do more t-shirts. Woo woo!

Sunday, February 6, 2011

Grocery Bag Holder

Time Needed: 1/2 hour
Level of difficulty: easy
Materials needed: canvas rectangle (about 18"x8", or whatever you desire), scissors, glue gun, elastic, safety pin, felt, ribbonDirections: Cut your canvas to the desired size. Run on over to your sewing machine and flip the fabric inside out. Sew a hem on the bottom big enough to thread the elastic through. Cut your elastic to somewhere between 1/2 to 2/3 the size of the width of the fabric. Then use the safety pin to thread it through. Sew the ends into place so they don't go anywhere. Stitch the top and sides together and flip right side out. Then, because it'd be boring without it, add a ribbon to hang it on your fridge (or wherever) and add some cute little felt flowers. Attach with the glue gun or the sewing machine, whichever suits your fancy. Stuff with those grocery bags, and you are set to go. Make two and give one to your best friend and you can be matchie. Aww, cute!

Sunday, January 16, 2011

GIANT embroidered wall sign

I've been working on this every day for a week and, I'm SO excited to unveil it to you!

Time Needed: 6 hours
Level of difficulty: easy
Materials needed: giant frame, printer, pencil, fabric, quilting batting, embroidery hoop, needle, embroidery floss, pins, scissors, Elmer's glue, paintDirections: Go find yourself a big HUGE frame. The one I have is 24x36 (that's half as tall as I am)! If you want to do a crackle frame, paint the whole thing with Elmer's glue. Then, while it's still wet, paint it with the color you want to crackle. As the glue and paint dry, the bottom color will show through. Way cheaper than real crackle paint, trust me! OK back to the embroidery part. Once you've chosen a phrase you'd like to embroider, play computer for awhile. Play around with fonts until you find one you love and that's reasonable to embroider. Look online to find free download-able fonts, too. That's where I found mine. Then, blow it up as big as you need to get it to fit (I used 300 point font - yeah, that's huge) and print that sucker out. Lay it out on the cardboard backing that came with the frame to get the look you want. It'll look something like this:
Then, trace on the pattern onto your fabric with your pencil. Do this lightly, and it'll more or less rub off when you're done. That'll look something like this:Back the fabric with your quilting batting and pin it down. I don't ordinarily pin these things down, but this is a big BIG project that wouldn't stay together otherwise. So pin your heart out all over the edges and throughout the middle to keep things where they need to stay. Stick your embroidery hoop on, and get started with embroidering. If you don't know how, check out the tutorial I have here. It should look something like this:

Halfway through! Lookin good, huh?

Once you're done embroidering all the words, lay it out in the frame to double check the look. This'll also let you know if you need a little sparkle or design added in.
I ended up thickening some of the edges of my red words and adding a few vines into the edges because it needed something. From there, secure the sign to your cardboard backing, stick it in the frame, and hang it on the wall. And then enjoy how COOL you are because this is an AWESOME project!
PS: In case you're wondering why I chose the quote I did, well.. it's kind of corny. The hubs puts up really well with my crafting and creating and messmaking. So when choosing a fun, cute quote, I actually took one out of a techno song. My hubs loves techno, so it was kind of a fun tribute to him. Aw, cute! :)


Button Redo

Saturday, December 18, 2010

Mistletoe

Time Needed: 10 minutes
Level of difficulty: easy
Materials needed: green felt, glue gun, scissors, pearl beads, ribbon or raffia

Directions: Cut out the pattern you'd like to use for your mistletoe. (I got mine here.) I also double backed mine to make it hold its shape when hung, but you do what works for you. Glue on the beads wherever you'd like the mistletoe berries to go. Glue on the ribbon or raffia however you'd like in order to hang, then hang and find your hubby! Woo woo!

Wednesday, November 24, 2010

Owl Stockings

Time Needed: 2 hours
Level of difficulty: intermediate
Materials needed: sewing machine, buttons, needle and thread, felt, 1/2 yard flannel, ribbon

Directions: Cut out the shape you'd like the stocking to be in. Then, cut out the owl, his beak, his wing, the branch, and the leaves. Pin them together and sew them on the top layer of the stocking. Leave the buttons off for now. Then, fold over the top of the stocking and sew down so that the lip is pretty. Pin the two sides of the stocking together and stick the ribbon to where the back seam will be. Sew together with the fronts touching and then flip right side out. Stitch on your button eyes and button holly berries. Hang over your fireplace (or in my case, closet) and bask in the glow of your wonderful creativity.

Thursday, October 7, 2010

Fall Applique Shirt

Time Needed: 30 minutes
Level of difficulty: intermediate
Materials needed: t-shirt, brown and orange felt, brown, orange, and green embroidery floss, scissors, needle, pins
Directions: Cut a circle out of the orange felt. Cut a dent in the top and bottom to make it more pumpin-y looking. Then, cut a stem out of the brown fabric. Pin them to place on the shirt and embroider around the outside the same way you would stitch a pattern (like in the "I love you" or the "buon appetito" signs). Make sure you use extra thick thread this time to ensure it stays on the shirt and make sure your knots are tight. Then, make the pumpkin look more like a pumpkin by adding 2 curved lines down the length of it. Take the green floss and make yourself a curved vine. And.. there you go! You can wear it from now clear till Christmastime because it's a plain pumpkin and that means fall. If you wanna make it Halloween-y, take some black felt and make eyes and a mouth and sew them on. I left it as is because I want to be able to wear it longer. Have fun!

Sunday, October 3, 2010

"I Love You" embroidered sign

You may be thinking to yourself: Self, this looks all red and covered in hearts and... um... it's October. Doesn't this girl realize it's more Halloween than Valentine's day? Well, dear reader, let me assure you that I get it. For those of you who don't know, my last name is Valentine, so I get to do this kind of craft whenever I feel like it. :)

Time Needed: 1 hour
Level of difficulty: easy
Materials needed: picture frame, scissors, embroidery thread, needle, embroidery hoop, fabric (both colored and plain), Fray Check, quilt batting, pencil, computer and printer (optional)

Directions: Use your computer to print out the design you want to embroider. Then, trace it on to the fabric. (Or, just free-hand your drawing on the fabric.) Take your colored fabric and cut out a heart. Line the edges with Fray Check and let dry. Put the batting behind the fabric and put it in the embroidery hoop. Then, use the embroidery floss to trace the outline you drew on the fabric. This is done by poking the needle through the top of the fabric and then poking it back down a few millimeters forward and pulling the thread through. The next stitch will poke through a few millimeters ahead of the completed stitch and work backwards to where you've previously stitched from. This gives a clean, thin, even line. Continue until done. Lay the dried heart where desired and sew on using a fat stitch. Don't worry if the stitches are uneven - it makes it look really cute if they are a little off. Tie off the thread when done. Then, use the cardboard form in the frame to back the finished stitched product and put it in the frame. Or, use the glass as your form and let the fabric be on the outside.

Tuesday, September 28, 2010

Revisited: Frayed Fabric Rose

Remember the frayed fabric rose? This one's about two times as big and made of a silky polyester. Just thought I'd show a different version to you...
Due to the last several posts... can you tell I spent my evening in my fabric flower garden? :)

Sassy Silk Sunflower

Time Needed: 10 minutes
Level of difficulty: easy
Materials needed: silky material (like a polyester), felt, beads, a flame source, hair clippie
Directions: Cut several circles in various sizes. Then, make big incisions around the edges of your circles (like, up to 1/4 inch big - they shrink during the next step). Stick the edge near the flame and watch it curl up. This gives the edge a really cool look. Once sufficiently singed, glue the pieces together largest to smallest. Glue felt to the back so you can't see it but so that it's reinforced. Glue a clippie to that, glue some beads to the center, and you're good to go! If you want to go back and visit the frayed fabric rose and put one of those in the middle, like I did in the picture, go for it. I used brown ribbon for that. Just an idea!

2-D Silky Rose

Time Needed: 10 minutes
Level of difficulty: easy
Materials needed: silky material (like a polyester), felt, beads, a flame source, hair clippie
Directions: Cut several circles in various sizes. Stick the edge near the flame and watch it curl up. This gives the edge a really cool look. Once sufficiently singed, glue the pieces together largest to smallest. Glue felt to the back so you can't see it but so that it's reinforced. Glue a clippie to that, glue some beads to the center, and you're good to go!

Crinkle Rose

Time Needed: 10 minutes
Level of difficulty: easy
Materials needed: silky material (like a polyester), felt, thread, needle, a flame source, hair clippie
Directions: Cut a long strip out of the fabric and do a big scallop on the edge. Stick the edge near the flame and watch it curl up. This gives the edge a really cool look. Once sufficiently singed, do a loose stitch through the length of the fabric on the opposite end than the burning took place. Pull the thread tight to get it crinkled. Use the glue to glue the crinkles in place so it looks like a rose. Glue felt to the back so you can't see it but so that it's reinforced. Glue a clippie to that, and you're good to go!

Felt flower

Time Needed: 5 minutes
Level of difficulty: easy
Materials needed: 2-3 pieces of different colored felt, glue gun, scissors, a few beads, hair clippie
Directions: Cut 3 or so circles out of the felt at different sizes. Lay them on top of each other and glue them together. Glue the beads on the top, and the barrette on the back. That simple, and that cute!

Saturday, September 25, 2010

Helpful Hints - Design Transfer

When working with fabric, you're often left trying to transfer a design from paper to the fabric. I haven't tried this idea personally, but one of my coworkers swears by it. What you do is you buy cheap laminating paper at the craft store. You put that in your printer and print your design on it from your computer. Regular ink works just fine. Anyway, then you put your newly printed design face-down on the fabric and you use an iron on a cool setting to transfer the ink to the fabric. Then, sew or paint or whatever on the fabric, and then send it through the wash. Supposedly, the ink comes out in the machine with just regular detergent. Now how's that for an idea!

Friday, September 24, 2010

Cute Kitchen Sign

Time Needed: 1 hour
Level of difficulty: easy
Materials needed: picture frame, scissors, embroidery thread, needle, embroidery hoop, fabric, quilt batting, pencil, computer and printer (optional)
Directions: Use your computer to print out the design you want to embroider. Then, trace it on to the fabric. (Or, just free-hand your drawing on the fabric.) Put the batting behind the fabric and put it in the embroidery hoop. Then, use the embroidery floss to trace the outline you drew on the fabric. This is done by poking the needle through the top of the fabric and then poking it back down a few millimeters forward and pulling the thread through. The next stitch will poke through a few millimeters ahead of the completed stitch and work backwards to where you've previously stitched from. This gives a clean, thin, even line. Continue until done. Then, use the cardboard form in the frame to back the finished stitched product and put it in the frame. Hang and enjoy!
Hint: when cutting your fabric to size, leave at least an inch extra on all sides to be able to fold around the cardboard when you're done. If you cut it exactly to the size of the glass in the frame, you're gonna have a REALLY hard time putting it in the frame without jaggedy edges or blank spots showing up. This extra inch or so gives you room to pull the fabric tight around the cardboard. I usually tape mine firmly into place on the back to make sure they don't go anywhere.
(PS - Don't judge that the wall under the picture frames is wet. I just did dishes and decided to wash down the wall as well. Promise it's clean!)