Thursday, February 24, 2011

Pasta Salad

Time Needed: 20 minutes
Level of difficulty: easy
Materials needed: 1 box pasta (your choice of noodle shape), 3 shredded cooked chicken breasts, 1/2 can corn, 1/2 can black beans, 1/2 large can sliced olives, 1 cup steamed green beans, 1 cup steamed carrots, 1 cup steamed pea pods, 1 diced tomato, 1/4 c olive oil, 1 t mustard, 2 T lemon juice, 1 t Italian seasoning (or enough basil, oregano, parsley and the like to equal 1 t), salt and pepper to taste
Directions: Cook pasta according to directions. Meanwhile, drain canned veggies and steam raw veggies. (Don't steam the tomato - ew.) In a jar, mix oil, mustard, lemon juice, Italian seasoning, salt and pepper, and shake until mixed. Pour all your ingredients into a bowl, including the dressing, mix together, and serve. Because this is full of veggies and meat, this can be your entire meal if you choose, or it can be a hearty side dish.

Saturday, February 19, 2011

(Badly Needed) Pillow Covers

This is one of my couches. When the hubs and I got married, my mom and dad gave us these babies so we could furnish our apartment. I remember having these couches before my 16 year old sister was alive. I wish I had a copy of the family pictures we all took on these couches wearing all denim - super sexy. Regardless, they are comfortable as all get-out, but they look a little... well... they could look better. I'm going to cover the couches eventually, but covering the pillows that are in the same pattern was what I had the energy for this week. Here's what I did:
Time Needed: 2 hours
Level of difficulty: intermediate
Materials needed: 4 yards of fabric plus 1/2 yard of accent fabric (variable by pillow size), sewing machine and thread, scissors, ugly pillows
Directions: Measure your pillows. Mine were 17x17. Then measure out how much fabric you'll wanna use. I cut out swatches that were 38x19 because then I had a 2 inch allowance for my amazing skills and because that's one less seam I have to sew if the front and back are already attached. Anyway... Go back to your original color and cut out a rectangle that's about the width of your pillow and add about 5 inches or so onto the length. As you are sewing all your seams all the way around the pillow, you're gonna add this to the side hems. It'll hang in the front, and the accent fabric will draw it together. Before you sew, grab your extra fabric rectangle, flip it inside out, and sew some tubes. Flip 'em right side out, sew them shut, and stick them on your piece that you'll be gathering. Now enjoy all those hems - on the extra fabric rectangle, on the sides of pillow, and on. Now, don't sew these shut - instead, sew flaps so you can stick the pillow in and so that when you get bored with these covers, you can make new ones and switch out the pillows without destroying your work. And voila! My ugly couches at least have cute pillows until I can cover those suckers.

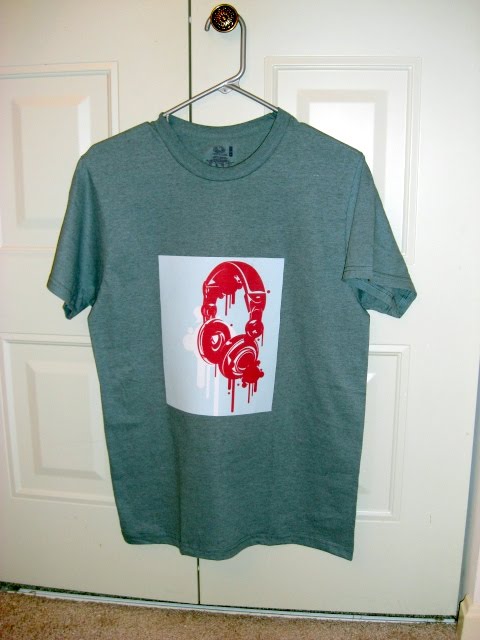
Cool T-Shirt

My hubs is really into music and computer games, so he's pretty much 24/7 attached to his headphones. Plus he used to want to be a DJ. I just had to surprise him with this neat t-shirt. And it was super cheap - double bonus!Time Needed: 5-10 minutes
Level of difficulty: easy
Materials needed: blank t-shirt, computer/printer, transfer paper, scissors, iron, ironing board
Directions: Find a picture you want to transfer and, if needed, photoshop that sucker. I lightened the one I found a little bit because of the t-shirt it was going on. Then print that baby on the transfer paper (follow the directions on the package). Lay out the shirt, and iron according to transfer paper directions. And wear with pride.

Cost breakdown: I got 4 shirts for 6 bucks in one of those multiple t-shirt packs at Wal-Mart. I also got my transfer paper there. It was like $3.50 for 3 sheets. So the whole thing cost less than 3 bucks, plus I have materials to do more t-shirts. Woo woo!

Sunday, February 6, 2011

Abstract Family Portrait

Wanna check out the original? Head over here.

Time Needed: 2-3 hours
Level of difficulty: intermediate
Materials needed: 2 colors of paint, 2 blank canvasses (your choice of size), paintbrushesDirections: Choose the color you want the background to be and paint away. The more coats you use, the longer it'll take to dry. You can go to some place like Home Depot and get a cool color sample so you don't have to buy a whole huge bucket and those are less than $3. Once your canvasses are dry, they'll look a little something like this:Then, and this is the hard part, draw a branch. Make it as scraggly as you want, but make sure that you put a lot of branches on. Follow your inner Bob Ross and find yourself a happy little branch. Look online at branches, look outside at branches, whatever. It's scarier to start than it actually is once you get started. This is obviously in the other color, by the way. Keep painting until your branch looks amazing. Finished branch by me and by my friend Monica (in which picture her hand makes its blog debut):
Then paint your birds. Not sure what kind of bird to do or how exactly one works? Grab that computer and look up bird silhouettes. From here, you can freehand one or print one and trace it. Whatever works for you. Put on one bird for every member of your family. Right now, it's just the hubs and myself, so we have only two birds. Monica, however, has four birds on her canvas because she has the cutest little boys running around her house.And there you go! Hang them on the wall, and feel awesome about the fact that you painted on canvas and that it looks incredible.

Chicken Chili Casserole

Time Needed: 45 minutes
Level of difficulty: easy
Materials needed: 1 boned chicken 1 pkg. flour tortillas,1 can cream of chicken soup, 1 can cream of mushroom soup, 1 can chili, 1 4oz. can green chilies, diced, ½ C. diced onion, 1 lb. mozzarella and cheddar cheese, gratedDirections: Layer half of chicken in bottom of casserole dish. Top with 1/2 tortillas torn into pieces. Mix soups, chili, green chilies, and onion. Spread ½ soup mixture over tortillas. Top with ½ cheese. Repeat layers. Bake uncovered for 30 minutes at 350°. Serve with tortilla chips and salsa and devour.

Thanks, Mom, for the fabulous recipe

Grocery Bag Holder

Time Needed: 1/2 hour
Level of difficulty: easy
Materials needed: canvas rectangle (about 18"x8", or whatever you desire), scissors, glue gun, elastic, safety pin, felt, ribbonDirections: Cut your canvas to the desired size. Run on over to your sewing machine and flip the fabric inside out. Sew a hem on the bottom big enough to thread the elastic through. Cut your elastic to somewhere between 1/2 to 2/3 the size of the width of the fabric. Then use the safety pin to thread it through. Sew the ends into place so they don't go anywhere. Stitch the top and sides together and flip right side out. Then, because it'd be boring without it, add a ribbon to hang it on your fridge (or wherever) and add some cute little felt flowers. Attach with the glue gun or the sewing machine, whichever suits your fancy. Stuff with those grocery bags, and you are set to go. Make two and give one to your best friend and you can be matchie. Aww, cute!

Ice Cream Sandwiches

Time Needed: 4 hours
Level of difficulty: easy
Materials needed: ice cream ingredients as directed by your favorite recipe, chocolate chip cookies

Directions: Mix the ingredients for your ice cream together. My ice cream directions call for 2 hours of chilling before mixing, hence the first part of the 4 hour time limit here. While this is chilling, you can take a nap, make your own chocolate chip cookies, go buy some gourmet cookies, watch an episode of "The Office" or whatever tickles your fancy. Then, whip out your ice cream maker and make you some ice cream. My ice cream maker takes 15 minutes, but some take up to an hour, hence another piece of time frame. When it's done, scoop it in between some cookies and stick these in the freezer for at least an hour. And that's the last part of why this takes so long. But it's so stinking easy and way better than any ice cream sandwich you'd buy in the store. Mmm... drool...