


 Directions: Wrap the leaf vines around the straw hoop and strategically glue into place. Glue the eggs down wherever you want them to go. Then attach the birds and stick the calla lilies into any empty spots or wherever they seem to fit best. Thread the ribbon through the top part of the straw hoop and hang from your door frame. Easy, fast, and oh so cute!
 Final cost of this project: $9. I got everything except the eggs at the Dollar Tree and the eggs were on clearance at Hobby Lobby. I love my life!
 This is Baby A. She is the first grandchild on my husband's side. We are so excited to have such a beautiful niece and we are so thrilled to welcome her into the family.
 Well, I decided it was time for action after heading to the Dollar Tree. I have come to love and cherish the Dollar Tree. Seriously, there are some real steals and deals in there. One of the things they had was these fabulous folding organizer bins. The white cabinet is full of them. All of them came with dividers, but I left those out of 2 so I could put bigger stuff in there. So now rather than being the cabinet from hell, it's the cabinet where all of my stuff is neatly organized.
 I then looked at the top of said white cabinet. Boring. It needed a facelift. So I used things I already had and dressed it up a bit. The hub's great aunt passed away last year, and she was a hoarder. On one trip to visit, my in laws brought some fabulous old books, which I used as a base for my lamp. I had a Willow Tree statue of a reading girl, so on she went. Then one of the teacup candles I made previously joined the mix. Then (and this is my favorite part), I added the suitcase. My friend Monica bought an old clarinet at a thrift store and is cleaning it in order to turn it into a lamp. I know, it's gonna be amazing. More on that later, I'm sure. Well, she didn't want the case. After cleaning the clarinet, it was too gross for her. Well, you bet your buttons I dibbesed that guy. And look how cute he is! Add a little greenery behind it so that there's not an awkward empty space, and there you go! Vintage tablescape for free!
 Then I moved on to the table. I used to teach junior high (at 26, saying something like that makes me sound a bit pretentious and like I'm trying to be more like 50 - tee hee!) and when we moved away, I took the long, skinny card table I put in my classroom with me to use as my craft table. Well, as you can see, it's visible now. I put everything away, cleaned it up, only left the essentials on the top, and wiped the whole thing down. Glamorous? No. Functional and actually usable now? Heck yes. You'll notice that I bought some hanging organizers and duct taped them to the sides. The duct tape is under the table so you can't see it, but then I can hang stuff from the side of the table that I need but that won't go anywhere else. Again, thank you Dollar Tree.
 Well, at this point, the wall was bare. Not to fear, Dollar Tree to the rescue again! Did you know they sell vinyl at the Dollar Tree!?! It's in the home office section, and it is a bit limited, but come on. For a dollar? Yeah, that's happening. So I bought two kits, one with a cute phrase and one with butterflies. And there you go, a cute and super cheap wall decoration.
 What you're not seeing in the room is that in the corner where I was standing to take the pictures used to be a quilting frame and 5 huge boxes full of food storage. Not very visually appealing. Well, they've all found homes in the closet now. Thanks to the hubs for the help on that one - my flimsy arms were not about to take on the challenge of hoisting 75 lb boxes of freeze dried food storage to a height taller than myself. And there you go! The room is clean and organized and a major project has been completed with an entire room overhaul. And the total cost? Well... $10. Yeah. And for that $10, I bought 2 vinyl sets and 8 organizational stuff-holders (that's the official name of those things, by the way). And this, of course, warranted that I share. Now if only I could find the motivation to do this with the rest of my house... :)
 Directions: Cook pasta according to directions. Meanwhile, drain canned veggies and steam raw veggies. (Don't steam the tomato - ew.) In a jar, mix oil, mustard, lemon juice, Italian seasoning, salt and pepper, and shake until mixed. Pour all your ingredients into a bowl, including the dressing, mix together, and serve. Because this is full of veggies and meat, this can be your entire meal if you choose, or it can be a hearty side dish.
 This is one of my couches. When the hubs and I got married, my mom and dad gave us these babies so we could furnish our apartment. I remember having these couches before my 16 year old sister was alive. I wish I had a copy of the family pictures we all took on these couches wearing all denim - super sexy. Regardless, they are comfortable as all get-out, but they look a little... well... they could look better. I'm going to cover the couches eventually, but covering the pillows that are in the same pattern was what I had the energy for this week. Here's what I did:
 Time Needed: 2 hours
 Directions: Measure your pillows. Mine were 17x17. Then measure out how much fabric you'll wanna use. I cut out swatches that were 38x19 because then I had a 2 inch allowance for my amazing skills and because that's one less seam I have to sew if the front and back are already attached. Anyway... Go back to your original color and cut out a rectangle that's about the width of your pillow and add about 5 inches or so onto the length. As you are sewing all your seams all the way around the pillow, you're gonna add this to the side hems. It'll hang in the front, and the accent fabric will draw it together. Before you sew, grab your extra fabric rectangle, flip it inside out, and sew some tubes. Flip 'em right side out, sew them shut, and stick them on your piece that you'll be gathering. Now enjoy all those hems - on the extra fabric rectangle, on the sides of pillow, and on. Now, don't sew these shut - instead, sew flaps so you can stick the pillow in and so that when you get bored with these covers, you can make new ones and switch out the pillows without destroying your work. And voila! My ugly couches at least have cute pillows until I can cover those suckers.
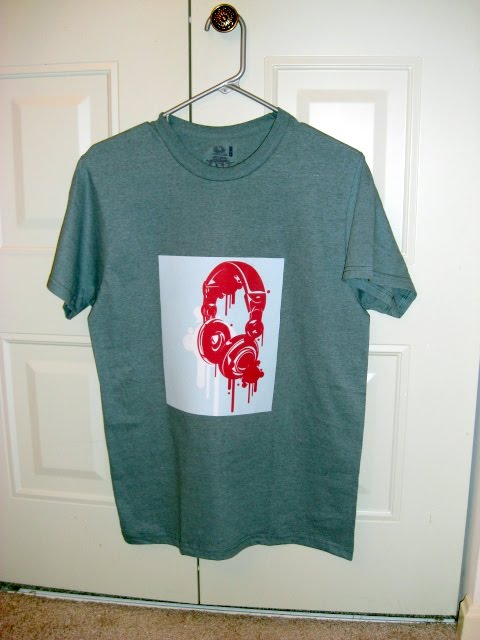 Time Needed: 5-10 minutes
 Directions: Find a picture you want to transfer and, if needed, photoshop that sucker. I lightened the one I found a little bit because of the t-shirt it was going on. Then print that baby on the transfer paper (follow the directions on the package). Lay out the shirt, and iron according to transfer paper directions. And wear with pride.
 Directions: Choose the color you want the background to be and paint away. The more coats you use, the longer it'll take to dry. You can go to some place like Home Depot and get a cool color sample so you don't have to buy a whole huge bucket and those are less than $3. Once your canvasses are dry, they'll look a little something like this:
 Then, and this is the hard part, draw a branch. Make it as scraggly as you want, but make sure that you put a lot of branches on. Follow your inner Bob Ross and find yourself a happy little branch. Look online at branches, look outside at branches, whatever. It's scarier to start than it actually is once you get started. This is obviously in the other color, by the way. Keep painting until your branch looks amazing. Finished branch by me and by my friend Monica (in which picture her hand makes its blog debut):
 Then paint your birds. Not sure what kind of bird to do or how exactly one works? Grab that computer and look up bird silhouettes. From here, you can freehand one or print one and trace it. Whatever works for you. Put on one bird for every member of your family. Right now, it's just the hubs and myself, so we have only two birds. Monica, however, has four birds on her canvas because she has the cutest little boys running around her house.
 And there you go! Hang them on the wall, and feel awesome about the fact that you painted on canvas and that it looks incredible.
 Directions: Layer half of chicken in bottom of casserole dish. Top with 1/2 tortillas torn into pieces. Mix soups, chili, green chilies, and onion. Spread ½ soup mixture over tortillas. Top with ½ cheese. Repeat layers. Bake uncovered for 30 minutes at 350°. Serve with tortilla chips and salsa and devour.
 Directions: Cut your canvas to the desired size. Run on over to your sewing machine and flip the fabric inside out. Sew a hem on the bottom big enough to thread the elastic through. Cut your elastic to somewhere between 1/2 to 2/3 the size of the width of the fabric. Then use the safety pin to thread it through. Sew the ends into place so they don't go anywhere. Stitch the top and sides together and flip right side out. Then, because it'd be boring without it, add a ribbon to hang it on your fridge (or wherever) and add some cute little felt flowers. Attach with the glue gun or the sewing machine, whichever suits your fancy. Stuff with those grocery bags, and you are set to go. Make two and give one to your best friend and you can be matchie. Aww, cute!


