Tuesday, June 28, 2011

Jammin' Berry Nails

I ordered some nail shields from Jamberry Nails and decided to try them out for you all to see.
They look really cute and it's a fun way to get a really neat pattern without all the legwork. The problem was that they didn't stay on very long and were hard to get to stick to my nails. So while they are super fun and super cute, I'd recommend using the Sally Hansen brand instead.

Saturday, June 25, 2011

Abstract Fam Pic - 4.0

My latest birds portrait for the cutest family of 6 ever. I'm totally loving the chocolate brown color.

Friday, June 24, 2011

Look what you did!

This is the first time I'll do a feature on here, and I'm so excited to show you what I'm excited about. I have gotten these ideas from various searches and linky parties, and I'm just tickled pink to show you all how neat you all are. Let's get started!

#1 Bumbleberry Pie from Trilogy EdiblesIt's so pretty it'd be hard to eat. But I'm sure I could find a way! :)

#2 Book Tote at Love Endures All ThingsNot only is this a great project for those of us who love reading, but this is absolutely hilarious! I'm definitely making myself one of these!

#3 5 Minute Fabulous Hair at Ali Grace Fashions and Trends I'm a big fan of big hair and I am totally in love with this 'do!

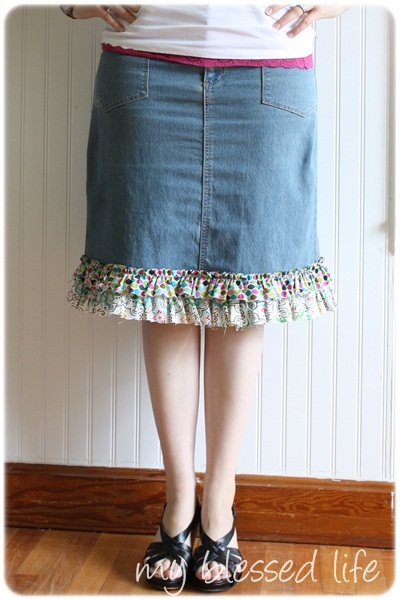
#4 DIY Ruffled Denim Skirt at My Blessed LifeIsn't this the cutest skirt ever? What a fun way to update your wardrobe!

#5 Bloggy Web Design Help at Sassy SanctuaryThis is one of several blog how-to's at Sassy Sanctuary, and this one is all about easier picture posting. This is a fabulous time saver and a great help!

Knock-Off Applebees Blondie Brownies

Thanks to my sweetie friend Megan for this fabulous recipe!Brownies: 1 cup sifted flour, 1/2 teaspoon baking powder, 1/8 teaspoon baking soda, 1/8 teaspoon salt, 1/2 cup chopped walnut, 1/3 cup butter or margarine, 1 cup packed brown sugar, 1 egg, beaten, 1 tablespoon vanilla extract, 1/2 cup white chocolate chips
Sauce: 1/2 cup maple syrup, 1/4 cup butter, 1/2 cup brown sugar, 8 ounces cream cheese, softened, 1/2 teaspoon maple extract or maple flavoring

Directions:
Brownies: Melt butter, add brown sugar, and mix well. Add egg and vanilla and mix well. Gradually combine dry ingredients. Stir in white chocolate chips. Pour into a 9-inch greased square pan and bake at 350 for 20-25 minutes.
While brownies are baking, make the sauce. Combine syrup and butter, cook over low heat until butter is melted. Stir in brown sugar until dissolved and remove from heat. Beat in cream cheese and maple extract until smooth.
To dish: Place a heaping scoop of vanilla ice cream on the warm brownie and drizzle with sauce and additional walnuts if desired.
If you wish to use the sauce later on, you can heat it again in the microwave until it reaches desired consistency.

Tuesday, June 21, 2011

Crackle Nail Polish

As promised, once a week, there's gonna be a nail polish post. I like doing fun and different things with my nails and I paint them at least once a week anyway, so why not put it up here?

This first once-a-week polish post (though I've posted about polish before) is a really cool concept that's, according to the one or two fashion magazines I've read this month, the latest trend. The good thing is that it's super easy. We are talking about crackle paint.
Here's how it works. You paint your nails a solid color, let it dry, and then put a thin coat of crackle paint on top. Make sure it's a thin coat or it won't crackle. Then put on a top coat to make sure it's legit, and there you go! It stays on quite well (I've had it on for 5 days with no chipping, and I'm a pro at chipping my polish) and it's super fun.

Changes

I'm going to make some changes to the good 'ole Create-A-Torium here. Good changes, mind you, but changes nonetheless. I'm going to start doing some really fun things.

Once a week, I'm going to do a post that's just all stuff I've found out there in the bloggy world. I'm gonna be showing you what you all are doing that's just amazing and fabulous.

Once a week, I'm going to paint my fingernails/toenails in a fun way and show you how to do it. Because you've gotta do something to keep it fun at work, right?

Once a week, I'm going to put up a new recipe. Mostly because I eat a lot and like to try new things.

The next list of things I'm gonna do are not going to be on a schedule like the previous three, but they'll be pretty frequent:
* Dollar crafts
* Goodwill finds/crafts
* BYOGG (bring your own glue gun) girls' night craft projects

And then there's gonna be more of the same 'ol craft-a-paloosa that there normally is. And that's the latest at the Create-A-Torium!

Monday, June 20, 2011

You knotty flop!

Yes, yes, another pair of flops. Last one (for this week), I swear!You see, this whole flop thing got started when I visited this site and saw these flops. I decided to try them, and then invent three bajillion of my own.Basically, thread the fabric into the toe slot (as in the 3 previous flops) and tie/glue it off. Then, tie two knots starting 1 inch above the flop. Then thread through the side holes, tighten to however tight you need them for your specific foot, and tie/glue off. And then make your friend Heather model them for you, but only after you bribe her with brownie banana splits. :)

Sunday, June 19, 2011

Fettuccine Carbonara

My hubby's great grandma came to America from Italy when she was a young woman. Grandma Luisa was a great cook, and so was her daughter, Grandma Laura. One of their amazing recipes was their fettuccine carbonara recipe. It's one of the hub's faves, so it had to be made for Father's Day.


Ingredients:1 pkg Fettuccine pasta, 1/2 lb Italian sweet sausage (remove casing and thoroughly cook loose sausage), 6 slices bacon (cooked, drained and crumbled), 2 large scallions or 1/2 small onion (saute in small amount of olive oil until translucent), 2 eggs, beaten well, 1/2 cup heavy cream, 1/2 cup grated Parmesan cheese, salt and pepper, to taste, red pepper flakes, to taste, snipped parsley (optional)

Directions:Cook fettucini. Drain well and place in warm serving dish large enough for tossing. Add crumbled bacon, sausage, onion, cream, grated cheese, raw eggs and snipped parsley. Toss until fettucini is well coated. Add salt, pepper and red pepper to taste. Serve immediately as pasta becomes gluey rather quickly.

Saturday, June 18, 2011

Flower Flips

Flip #3 time. Take a piece of fabric and roll it up like a cigar (since I know so much about cigar rolling and all). Loop it into 5 pieces and glue it to the back of a big flat bead. Then glue that to the strap of your flip. For security, glue a scrap of fabric to the back of the strap and the back of the bead. Super easy, super fun, and super cute!

Criss Cross Flip Flop

Time for flippy #2. This starts the same as flip 1. Tie off the flop under the toe strap, but this time, tie a knot about an inch past the top of the flop. Take an extra piece of fabric and create loops on the side straps, and thread the fabric through the toe straps through these. Take the extra fabric and create a bow on the sides. Add an extra piece of fabric across the top of the foot to keep the flop tight, and there you go. So fun!

Beaded Flip Flop

It's summer. That means flip flops. And that means crafting flip flop straps. So here's flip #1 - the beaded flip flop. Cut out the plastic strap and cut 2 pieces of fabric. Thread them through the toe strap and tie them off. Glue if needed. Thread on the bead, and then thread the straps through the side holes. Put your foot in the sandal to measure how tight you need to tie the straps, tie them off, and voila! The easiest pair of flips ever. And super cute, too!

Happy Father's Day

For Father's Day, I decided to make my dad a specialized picture frame. I started by taking a frame with 3 picture slots and etching it. I didn't have contact paper, so I used masking tape to trace the letters so I could paint over the bare spots with etching cream.
Then I traced the etching in marker and put pictures of all of us behind the glass, and voila - a personalized picture frame for Dad.
Happy Father's Day

Friday, June 17, 2011

I'm being featured!

Have you heard of Six Sister's Stuff? If not, you need to go check them out. Mostly because they are full of cute, cute stuff, but partially because they were nice enough to feature me on their blog. They are the cutest group of 6 sisters who craft and blog with each other from across the country. They are darling. And they liked my cutie pies. They are doing a big Father's Day pie post, and the cutie pies made the cut. Thanks, ladies! I'm tickled pink!

As Promised, Costumes

In my previous post about the mini pies, I mentioned the murder mystery party we were headed to. Well, I also promised pictures of our costumes. I'm also gonna do a price breakdown on the costumes because it was unreal how cheap they were. Here we go!

Costume 1: Sea Captain
Total Cost: $12.50
Coat: $4 at Goodwill (plus a little ribbon I had lying around to do that nautical cuffs.
Cane: $1.50 at Horner Novelty
Pipe $3 at Horner Novelty
Hat: $4 at Partyland
Metals, pants, shirt, tie and shoes: random stuff we had lying around that we used as is or that I glue gunned the crud out of

Costume 2: Italian opera star
Total Cost: $10.50
Dress: $4.50 at Goodwill
Fan: $1 at Dollar Tree
Boa: $3 at Horner Novelty
Gloves: $2 at Horner Novelty
Shoes, jewelry, feathered hairpiece (which I'm bummed you can't see in this shot): random stuff we had lying around

Also, here's my take on murder mystery parties. Throw one. Like, now. The "How to Host a Murder" brand murder mystery party is the best bang for the buck (they're the best developed parties of this sort) and it is hilariously memorable. I can't wait to steal Heather's camera and get the other pics from the party. I'll have to break down everyone else's costumes for you as well. Let me preface that post by saying there was a legit from Germany lederhosen involved. Yeah, good times!

Friday, June 10, 2011

Cutie Pies

I am headed to a murder mystery party tomorrow (pics of the costumes that have been made to come), and I am in charge of making dessert. So I decided to do a fun, summery dessert and make a strawberry pie. But why stop there? Why not make individual serving pies? Oh yeah, that happened. Let's take a look:

Ingredients: 2 (8 inch) pie shells, divided into 8 ramekins and baked, 2 1/2 quarts fresh strawberries, sliced, 1 1/2 cup white sugar, 4 tablespoons cornstarch, 2 cups boiling water, 2 (3 ounce) packages strawberry flavored gelatin

Directions:
Bake off the pie shells.
In a saucepan, mix together the sugar and corn starch; make sure to blend corn starch in completely. Add boiling water, and cook over medium heat until mixture thickens. Remove from heat.Add gelatin mix, and stir until smooth. Let mixture cool to room temperature. Slice strawberries so you can fit more berry goodness in each pie shell!Place strawberries in pie shells and then spoon gelatin mixture evenly into pies. Chill in the fridge until set.My thoughts? Serve with vanilla ice cream. :)