Wednesday, October 27, 2010

50th Birthday Book

Time Needed: 90 minutes
Level of difficulty: easy
Materials needed: blank scrapbook, scrapbooking paper, glue stick, stickers, photos, 50 memories, printer, printer paper, shaped edge scissors
Directions: Because this is for a 50th birthday, there are 50 memories. If you are going to do this for another birthday, just adjust your memories accordingly. Have everyone involved in giving this gift split up the 50 memories. Have them typed, put them in cute font, and print them onto the printer paper. Cut the memories with the shaped edge scissors. Set your memories and photos on top of the scrapbook pages to get an idea of how you'd like the layout to be. Then, remove these and back each page as desired with the scrapbooking paper. Glue on the memories and photos and accent with the stickers.
My siblings and I have done this for both of my parents' 50th birthdays, and these books now display prominently in their home. They are some of my parents' most prized possessions. I've included several pictures with this one so you can see more of what the finished product looks like.

Sunday, October 24, 2010

Bread Bowls and Pot Pie Stew

Can you tell I've been dying for soup season to get here? Don't worry - I have like 3 more soups I'm posting in the next few days.
I can't take credit for this one. I found it at the King Arthur Flour website. I will, however, share my modifications.

  1. Double the chicken stock and triple the milk. Otherwise, it's more like coated meat and veggies. In fact, as it was, I'd probably still like more liquid.
  2. I don't have pearl onions nor does my grocery store. So I diced and sauteed a normal one and threw that in.
  3. I'm an Idaho girl through and through. I diced a few potatoes, boiled them, and tossed them in as well. Mmm yum!

Chicken Noodle Soup

Time Needed: 45 minutes
Level of difficulty: easy
Materials needed:
1 large onion, diced, 2 large carrots, diced, 3 ribs of celery, diced, 1 tablespoon garlic, 2 tablespoons olive oil (I use garlic infused oil, personally), 8 cups chicken stock, 1 cup water, 1 1/2 cups diced cooked chicken, 1 1/2 cups diced potatoes, cooked, 1/2 package egg noodles, cooked, 1 cup instant rice, uncooked, 1 teaspoon dried thyme, 1 teaspoon dried parsley, salt and pepper, to taste

Directions: Heat the oil in a stock pot. Saute onion, carrot, celery, and garlic until they soften. Add the stock and the water, and bring to a boil. Add chicken and rice, cook until chicken is heated through. Add potatoes, noodles, and seasonings. Cook until rice is done or until you feel good about it. In case you are wondering, this takes less than 30 minutes to cook. I added 15 to the total time for chopping and pre-cooking stuff.

*Note - this is also really good if you leave out the potatoes done this way. If you heap the soup over mashed potatoes, that's really good, too (props to Aunt Jill on that one)

BYU Mint Brownies

If you've ever been to BYU and had the privilege of eating their mint brownies, you might be so excited about me posting this recipe that you are giggling and bouncing up and down. Well, hold still so you can read this, okay?

Time Needed: 4 hours (including cooling time)
Level of difficulty: intermediate
Materials needed:

Brownies: 1 c margarine, 1/2 c cocoa, 2 T honey, 4 eggs, 2 c sugar, 1 3/4 c flour, 1/2 T baking powder,
1/2 t salt, 1 c. chopped walnuts (optional)
Mint icing: 5 T margarine, dash of salt, 3 T milk, 1 T light corn syrup, 2 1/3 c powdered sugar, 1/2 t mint extract, 1-2 drips green food coloring Chocolate icing: 1/2 c cocoa, 1/3 c milk, 1 1/2 t vanilla, 6 t softened butter, 2 2/3 c powdered sugar


Directions: Melt margarine and mix in cocoa. Allow to cool and add honey, eggs, sugar, flour, baking powder, and salt. Mix well. Add nuts. Pour batter into a greased 9x13 pan. Bake at 350 for 25 minutes, or until toothpick inserted int he middle comes out clean. Allow to cool completely before frosting.
Prepare the mint icing: soften margarine, add salt, corn syrup, and powdered sugar. Beat until smooth and fluffy. Add mint extract and food coloring. Mix. Add milk while mixing and mix until consistency is just thinner than cake frosting. Spread over cooled brownies. Stick brownies in the freezer for 10-15 minutes to let icing harden.
Prepare the chocolate icing: cream the butter, add sugar and cocoa and mix. Add milk, mixing the whole time. Add vanilla and mix. Take brownies out of the freezer and spread chocolate icing on the top. Allow to harden and serve.


Crock Pot Chicken Tortilla Soup

Don't worry, ducklings, I haven't forgotten you. I was merely away from my crafting abode.

Time Needed: 15 minutes prep time, 8 hours in the crock pot
Level of difficulty: easy
Materials needed: 1 lb cooked shredded chicken, 1 can diced tomatoes, 1 chopped medium onion, 1 can red enchilada sauce, 1 can diced chiles, 2 cloves minced garlic, 2 cups water, 1 can chicken broth, 1 t cumin, 1 t cayenne, 1 t salt, 1/4 t pepper, 1 bay leaf, 1 small pkg frozen corn, 1 can drained black beans, 1 T chopped cilantro, 1/2 c instant white rice, shredded cheese, tortilla chips

Directions: Put everything in the crock pot except the rice, cheese, and tortilla chips. Stew in the crock pot 8 hours. When done, add the rice and let sit for 5 minutes. Then, dish soup and top with cheese and tortilla chips. Enjoy!

Sunday, October 10, 2010

Where Credit is Due

My amazing cousin Krystal over at Sassy Sanctuary hooked me up. Look at how amazing she is! Do you love the new layout/design? Because I do! Thanks again, Krystal!

Thursday, October 7, 2010

Fall Applique Shirt

Time Needed: 30 minutes
Level of difficulty: intermediate
Materials needed: t-shirt, brown and orange felt, brown, orange, and green embroidery floss, scissors, needle, pins
Directions: Cut a circle out of the orange felt. Cut a dent in the top and bottom to make it more pumpin-y looking. Then, cut a stem out of the brown fabric. Pin them to place on the shirt and embroider around the outside the same way you would stitch a pattern (like in the "I love you" or the "buon appetito" signs). Make sure you use extra thick thread this time to ensure it stays on the shirt and make sure your knots are tight. Then, make the pumpkin look more like a pumpkin by adding 2 curved lines down the length of it. Take the green floss and make yourself a curved vine. And.. there you go! You can wear it from now clear till Christmastime because it's a plain pumpkin and that means fall. If you wanna make it Halloween-y, take some black felt and make eyes and a mouth and sew them on. I left it as is because I want to be able to wear it longer. Have fun!

Sunday, October 3, 2010

"I Love You" embroidered sign

You may be thinking to yourself: Self, this looks all red and covered in hearts and... um... it's October. Doesn't this girl realize it's more Halloween than Valentine's day? Well, dear reader, let me assure you that I get it. For those of you who don't know, my last name is Valentine, so I get to do this kind of craft whenever I feel like it. :)

Time Needed: 1 hour
Level of difficulty: easy
Materials needed: picture frame, scissors, embroidery thread, needle, embroidery hoop, fabric (both colored and plain), Fray Check, quilt batting, pencil, computer and printer (optional)

Directions: Use your computer to print out the design you want to embroider. Then, trace it on to the fabric. (Or, just free-hand your drawing on the fabric.) Take your colored fabric and cut out a heart. Line the edges with Fray Check and let dry. Put the batting behind the fabric and put it in the embroidery hoop. Then, use the embroidery floss to trace the outline you drew on the fabric. This is done by poking the needle through the top of the fabric and then poking it back down a few millimeters forward and pulling the thread through. The next stitch will poke through a few millimeters ahead of the completed stitch and work backwards to where you've previously stitched from. This gives a clean, thin, even line. Continue until done. Lay the dried heart where desired and sew on using a fat stitch. Don't worry if the stitches are uneven - it makes it look really cute if they are a little off. Tie off the thread when done. Then, use the cardboard form in the frame to back the finished stitched product and put it in the frame. Or, use the glass as your form and let the fabric be on the outside.

Recipe book recipes

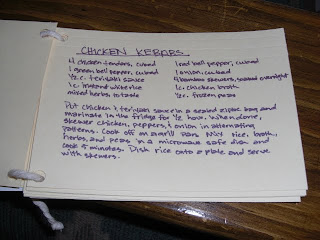
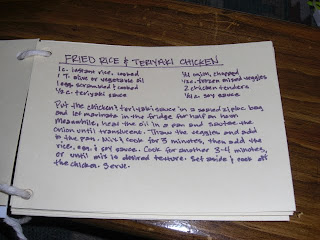
Remember that time I made a recipe book? If not, it's like 3 posts down. Anyway... I decided to post all the recipes from the book. They are for 2 people, so if you wanna use them for more, just increase accordingly. I did pictures of all of them because, well, there's like 12 of them and I didn't feel like typing all of them out. Click on them to enlarge them. Enjoy!


Saturday, October 2, 2010

Multigrain Bread

Time Needed: 2 hours
Level of difficulty: easy
Materials needed: 1 1/4 cup milk, 1 tablespoon softened butter, 1 teaspoon salt, 2 tablespoons sunflower seeds, 2 tablespoons sesame seeds, 2 tablespoons flaxseed meal, 2 tablespoons millet, 2 tablespoons quinoa, 2 tablespoons rolled oats, 1/2 cup honey, 1 1/2 c bread flour, 2 cups whole wheat flour, 1 package yeast, bread pan, cooking spray
Directions: Stick all the ingredients into your stand mixer and mix for 10 minutes. Test to make sure dough isn't too sticky. The 10 minutes of mixing does the kneading for you, so after that mixing, just let the dough rise until doubled, about 1 hour. Knead the dough for a few minutes, shape into a loaf, and place in a greased bread pan. Rise until double, or about 30 minutes. Preheat oven to 350 degrees Fahrenheit. Then, put the risen bread on the bottom shelf of the oven and cook 35-40 minutes, or until done. Remove from the oven and from the pan and let cool on the counter.