Saturday, July 9, 2011

Rockin' Guac

Guacamole. Either you love it or you hate it. And you probably love it. I have the best recipe for guac ever and I'm totally gonna share it with you. It's more labor intensive than the cheater's "just add salsa" version, but it's so worth it. Let's begin!

Time Needed: 30 minutes
Level of difficulty: intermediate
Materials needed: 1-2 jalapenos, 2 tomatoes, 1/2 red onion, 6 green onions, 5 tablespoons cilantro, 3 tablespoons garlic, juice of 1/2 to 1 lime, 8-10 avocados, salt to taste
Directions: Roast your jalapenos (this is why I gave this recipe an intermediate rating). Put them either in a pan or directly on the burner and rotate them occasionally. You're looking to blister the skin. Because of all the moisture in them, they will wiggle and pop and they are super fun to watch. When you're done roasting them, dice them up very finely. They contain a lot of heat, and no matter how much you like heat, biting into a huge chunk of jalapeno is not fun. The inside of the pepper is where most of the heat comes from. So if you like a lot of heat, chop it with the membranes and seeds and all. If you're like me, and a little goes a long way, take that stuff out and then chop it. Word to the wise: don't touch your nose or eyes for a few hours after chopping your jalapenos. And wash your hands thoroughly like a bazillion times. You do NOT want that stuff in your eyes. Also, with jalapenos, the longer they sit in something, the more of a potent flavor they will lend to the dish. So if you like it spicy, wait a little bit before nomming down on the finished product.

Chop up your onions, tomatoes, garlic, and juice your lime. Add all of that and that jalapeno into your bowl and top with salt. This will bring out some of the juices as you move on to the next step and will help the flavors marry a bit. While this his happening, cut open your avocados and cut into chunks. Depending on how you like the consistency of your guac, you can finely chop them, blend them, mash them with a potato masher, or (my favorite) put them in your food processor. Once you have the desired consistency, chuck it in with the rest of the ingredients and mix away. Taste to make sure you like the flavor combos, and add anything that seems to be lacking. But don't eat all of it before the party. Or do and don't tell anyone. Either way, it'll be delicious.

Pico de Gallo

For anyone who doesn't know, pico de gallo is fresh chunky salsa. Or, if you're being literal, the translation means "beak of the rooster" which obviously has a lot to do with the fact that it's really salsa. Then again, burrito means "little donkey" and that doesn't sound very appetizing, either. Back on topic. Pico de gallo is delicious and amazing and you should totally make it. Let me share my fabulous recipe with you.

Time Needed: 30 minutes
Level of difficulty: easy
Materials needed: 8-10 Roma tomatoes, 1/2 red onion, 3 green onions, 3 tablespoons garlic, 3 tablespoons cilantro, 1 jalapeno, 1-2 tablespoons olive oil, salt to taste
Directions: Dice and mince the crud out of everything. Obviously, the size of chunk will depend on the ingredient. The garlic and jalapeno will be much more finely diced than the tomato and cilantro. All of this is to personal taste, so make it as chunky or as fine as you'd like. And, if you like more or less of something, well, add more or less of it. I like a juicy salsa, so I squeezed my tomato chunks a little after chopping them, but if you like a less juicy option, leave that part out. Drizzle with a bit of olive oil (I used my garlic infused olive oil - zing!) and top with salt. Make sure you have enough chips, though, because you'll want to eat all of this in one setting.

Side note: The garlic in this is the fresh garlic my friend gave me that I mentioned here and the cilantro is from my garden that I mentioned here. Let's just say that I made everyone's 4th of July a little better by bringing this to the party. :)

Friday, July 8, 2011

Update: apartment gardening

If you'll remember, I started a little garden on my apartment balcony. Let's check up on that garden, shall we?Look at that bright red strawberry! I can't wait to eat it. And the one behind it isn't looking too shabby, either!

I told my friend Monica I wanted to buy a tomato plant. She told me she had 6 growing out of her compost pile and to come get one. These things are growing like crazy. I'm telling you what, that's the best way to start a plant ever. I can't wait to find out what kind of tomatoes these are going to grow up to be.

My bell peppers are still just buds and are taking the longest to get going. That's okay, though. It's still fun to watch them grow. They're going to turn out beautiful - I just know it!

Because it was getting dark, my hand had to make a debut in these photos. Yes! Look at the size of that jalapeno. The best part? I've got 5 others that size and 10 smaller ones that are just getting started. That's where my best success in the garden has been. Now if only I knew how to use more than one jalapeno at a time!

I also had cilantro that grew beautifully, but I harvested it last week so it wouldn't' go to seed. It made an amazing addition to a fabulous pico de gallo (recipe to come soon).

Because of my soil choice (aka not Miracle Gro), my carrots and onions didn't fare too well. That's okay, though. My other plants are doing wonderfully, and for a first time gardener who's growing everything on her balcony, I'm very pleased with the results

Garlic Smashed Potatoes

I have a wonderful friend who gave me 2 bulbs of fresh picked garlic. Have you ever seen fresh garlic? It's beautiful! The stuff they sell at the grocery store is dried up and wrinkled, but the fresh stuff is soft and a bit onion-y looking. The cloves inside taste just the same, and it's easier to get to them. So what does one do with two whole bulbs of fresh garlic? Make stuff, of course! And garlic smashed potatoes was right at the top of my list.Time Needed: 20 minutes
Level of difficulty: easy
Materials needed: 4-6 red potatoes, 1-2 cloves of garlic, 2 tablespoons butter, 1/4 cup milk, 1/4 cup grated Parmesan, salt and pepper, to taste

Directions: Slice potatoes into chunks and put in a pot with the garlic. Cover with cold water and salt water. Bring to a boil and boil until fork-tender. Drain off the water and mash potatoes and garlic all together. Put in butter, milk, and cheese (add more if needed to get desired consistency) and mash together. Top with salt and pepper and enjoy!

Flower Fingers

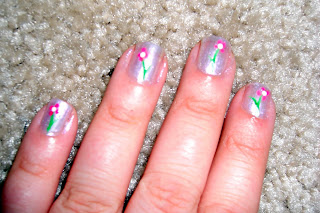
This week, I decided to try out some of those thin brush nail paints. I started with a coat of pale pink paint and let it dry. Then I took a green thin brush paint and did two lines, one for the stem and one for a leaf. Then I took a pink thin brush paint and did 5 dots around the stem for the petals. I didn't have a white thin brush paint, so I improvised. A little acrylic toll paint and a toothpick allowed me to do a white dot for the center of the flower and to do a streak up the leaf to define it. Pretty cute, huh?

Friday, July 1, 2011

Look what you did!

Let's see what neat things you've been up to this week!

#1 Berry Cheesecake at Lady Behind the Curtain
Um... drool, anyone?

#2 Dated Wall Art at Glitter and GritsWhat a darling way to show off your family.

#3 Owl Pillow at The Crafting FiendI love owls, and this little guy is just melting my heart.

#4 Make your own beach lantern at The Country Chic Cottage
I know what I'm making next craft night!

#5 Make blueberry banana bread in a jar at ReMarkable HomeI just think these jarred desserts are adorable, and this one looks extra delicious.

Great job, everyone! Keep up the beautiful, creative work!

Make Your Own Kettle Corn

Yep, that's right: homemade kettle corn. And it's super easy as well as super delicious. Let's break it down, shall we?
Time Needed: 5-10 minutes
Level of difficulty: easy
Materials needed: 1/4 cup vegetable oil or butter (I like butter better, but whatever suits your fancy), 1/2 cup unpopped popcorn kernels, 1/3 cup sugar, 3-4 teaspoons salt (to taste)
Directions: Melt your butter and bring to a boil or heat your oil until it ripples/shimmers in a large saucepan or soup pot. (That's right, I said soup pot - in my opinion, it works way better than a saucepan!) Pour in the popcorn and sugar and stir. Cover. When the kernels start to pop, shake the pot every few seconds to mix the pot and keep the popcorn from burning. As soon as there's a layer of popped kernels covering the bottom (and if you're brave enough), open the lid just enough to fit in a wooden spoon and stir until popping slows to about the speed you'd take it out if you were using a microwave popcorn bag. Stirring helps to keep it from burning, which I definitely did the first time and totally want to keep you from doing because it stunk SO badly. Once the popcorn is done, immediately pour into a bowl (to keep it from burning) and put in the salt. Toss the popcorn to evenly distribute the salt.
And then... time yourself to see how long the popcorn will last. I'm serious. My husband hates popcorn, and he requested that I make this the next two days after I made it and still talks about it. My bf Monica said she had dreams about it the night after she ate it, and she said her husband, who also hates popcorn, hogged the bowl when she made a big batch of it the next day. Seriously, you are gonna love this business. Delicious!