I was particularly inspired this week by the neat family trees that I've seen people working on. I'm not talking the ordinary kind, but the super crafty kind. I think they are lovely had I had to show you.
#1 Legacy Family Trees at Jill Means DesignsDo yourself a favor and enlarge that image. Seriously, it's beautiful and I am in awe of it.
#2 Family Tree Quilt at Team Quiltsy
I bet this took forever to do, but my word, it's beautiful.
#3 Quilled Family Tree at Sun Scholars
How fun is that? I especially like that there are roots for the tree.
#4 Picture Tree at the Brocton CG Blog
This is a great way to display family photos, especially if you have really old ones of ancestors. I love it!
#5 Framed Family Tree at A Punctuated Life
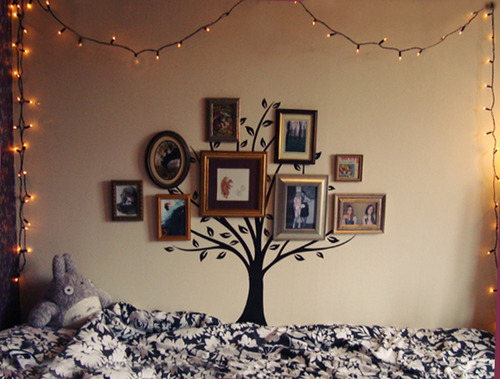
This would be fun in a kid's room, especially if Grandma and Grandpa live far away.
Aren't these all just so beautiful and inspiring? They are just all so fun. Good job, all - keep up the good work!
Sunday, July 31, 2011
Saturday, July 30, 2011
Homemade Pizza
My husband loves pizza. Like, will eat it for every meal for 6 days in a row without getting sick of it. I know this because he's done it. So I decided to make pizza for dinner. Last time I made pizza, I used a store mix for the crust. Yikes. That was a bad idea. So this time, I decided to brave the wild and make my own. Not that adventurous, I know, but it has to be tried, right? On with the recipe!
Good Housekeeping's pizza crust recipe
2/12 to 3 flour
2 1/4 t yeast
1/2 t yeast
1 c warm water
2 t oil
In a large bowl, combine 1 1/4 c flour, yeast, and salt; add water and oil. Beat on low speed for 30 seconds. Then beat on high speed for 3 minutes. Add the rest of the flour and mix. Turn out and knead until you have a moderately stiff dough that is smooth and elastic. Divide the dough in half. Cover and let rest for 10 minutes. Roll dough out to fit your pan or tray or stone or whatever you're using to bake the dough on. Put the dough on your baking apparatus, cover, and let rise for 35-40 minutes, or until doubled in size. Preheat oven to 400. Prick the crust with a
fork so it doesn't bubble up and explode. Bake for 10-15 minutes, or until golden brown. Take out of the oven, spread the sauce on the crust, add cheese and your favorite pizza toppings, and then pop it back in the oven for 10 or so minutes, or until all bubbly and gooey and delicious. And then eat it.
Chocolate Dipped Strawberries
Dipping strawberries is no news to anyone at this point. I just wanted to show them off.For anyone who doesn't know how to do them, I'm going to tell you the easiest way to do them. Put some chocolate chips in a microwave safe bowl or cup. Nuke at 30 second intervals, stirring between each. When melted, dip your washed and dried berries. Place on wax paper to harden. It works best if the wax paper and whatever you line with the paper has been in the freezer - the cold will help it harden. If you want to drizzle with contrasting chocolate, just put some of the melted stuff in a Ziploc, snip the very corner, and drizzle away. Let harden, and enjoy!
Road Trip Cake
I have a good friend who is leaving for college. She'll be driving across the country to attend university, and I wanted to make her a special cake to say goodbye and good luck. Here's what I came up with:
I depicted her road trip using food. Yu-um! Let me tell you how I did it.I baked a plain 'ole cake. Then, I used granola bars to criss-cross the cake, as if it was a road. I iced both sides of the cake. and covered the left side with coconut. (I dyed it green by putting it in a Tupperware container with a bit of food coloring and shaking it.)
I took some small brownie bites and laid them on the far right side as rolling hills. I cut some ice cream cones in half, dipped them in icing, and then dipped them in the coconut.
For the car, I took a Twinkie and cut a piece of the front to make it look like the front of a car. I did the same with a much smaller piece on the back. I dipped this in chocolate and put it in the freezer until it hardened.I used icing for the windows and purple Froot Loops for the tires. I stuck it on the gravel road with icing and then iced a dotted line along the path.
It was a super fun cake to make, though it did take forever. She loved it and was so excited to see it waiting at work for her. She'll do great, though we'll sure miss her!
Subscribe to:
Posts (Atom)